Saturday, September 17, 2016

Pokemon strike no.1

Yay! For Pokemon.
Seems like Pokemon wave invades everywhere at the moment. Pokemon go is not allowed in our house since my kids are too young to play but the T.V program show it 7 days a week. So, they are quite obsessed by Pikachu and his Pokemon friends.
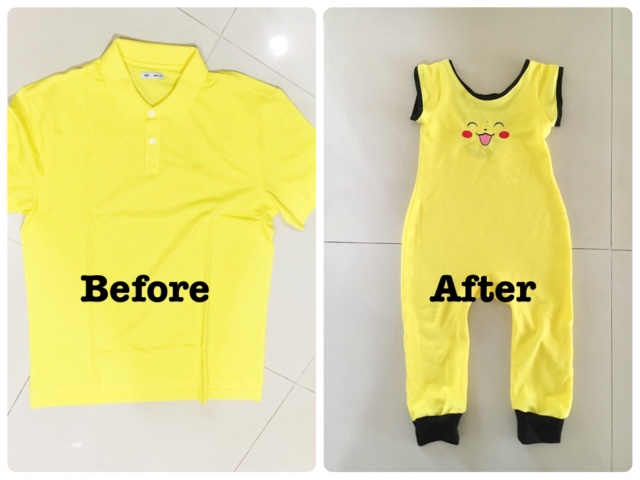
My plan is to sew Pokemon inspired outfit for both of my girl. I started with the little one. She is an active girl and I think romper would suit her. Who doesn't like to see the little todd running around in cute romper? 

I can't find the right yellow fabric for romper, so I up-cycled itfrom xxl polo t-shirt. 

The romper is made with Magil&Lil romper pattern from shwin designs. This pattern is very cute and versatile. You can get many looks just from one pattern, including dress/short romper/with faux t-shirt style.


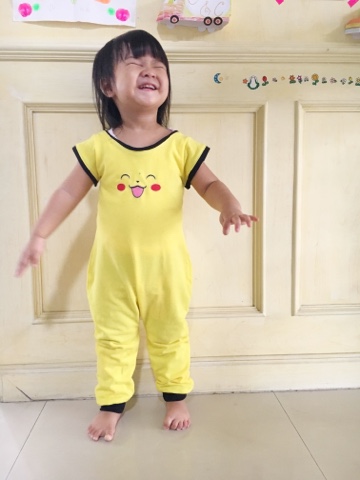
I have no idea why the girl keep smiling like this all the time that I took her photo. To imitate Pikachu expression, I guess? Lol.
 
Or she was very happy with her new romper? I'd love to believe that cox mommy sooooo happy to see her smile in mom made outfit!


What do you think about this Pikachu romper? I would love to hear from you. Thank you for stop by.

Penya

Saturday, August 6, 2016

The 3rd life of my maternity t-shirt

Hi all!

I didn't make or re-make things much lately but the refashion mojo has just striked back when I started to work out again, about 2 years after I gave birth to my second girl. 
I have many t-shirts from my maternity time lay around, comfy but not so flatter on me at the moment (still have 3 kg left and a permanent muffin top tummy).
This t-shirt was refashioned once by stencil on its front. I decided to give it the 3rd life with the easiest way, cut out t-shirt.
 
This is a no sew and very easy refashion which you can find its how-to floats around Pinterest. I recommend using a quiet big t-shirt for this project to get the loose tank top as the result. Mine is size L and end up fit for me.

 
I found the work out tank tops are pricey and plan to refashion more of my t-shirt. I hope it will turn out well and I will share with you again.


Happy refashion!

Penya, an apprentice housewife

Monday, February 16, 2015

February "Free For All" :Circle Skirts Variety

This month has a fun series going on at Frances and Suzanne, it's a February "Free For All". All participants will sew up something base on free patterns. And I was lucky enough to be one of participant, hooray!


My creations are the variety of simple circle skirts which base on one FREE pattern and another one tutorial. They are very EASY and fast to make. As each skirt took 10-30 minutes! After having a baby, EASY is my first rule of sewing!

For me, the circle skirts have 2 types. One with elastic waistband and one without. The first freebie is the famous circle skirt tutorial by MADE which is the one with elastic band. I bet that you've ever heard about it or even pin it to your board. But did you make it yet??? I made skirts base on this tutorial many times, it's awesome! Come on, let's sew up some for the girl or for yourself.

This circle skirt made from 6 panels and applique. It's a first skirt that I made since 2 years ago.

This circle skirt is made from knit and has a shorts attached for modesty. It super twirly and my girl love it.

Dana also offers pattern of circle skirt for little baby size 0-3. I've adjusted it a bit for my almost 6 months old. Super cute!

Tips: The center circle which left from making skirt can use to make a matching head band for your baby too!

You can even make the circle skirt in your size with the same tutorial. I did it twice, one made from up-cycled tablecloth and another one made from pre-ruffled fabric. (What you see here is BEFORE I gave a birth to the second child. Fortunately, both skirts have elastic waist band and can accommodate my mummy tummy)

The second style of circle skirt is the one without elastic band. So, it involves zipper...that's not so hard, trust me! Anyway in case you insist to make it with elastic waistband, this pattern also has instructions for make it. 
This pattern called Trio of circle skirts from My Treasured Heirlooms. It's a PDF pattern range from size 12m to 12 years including doll size!!! Annastasia, the designer of My Treasure Heirloom is so generous to offer this pattern for free. You've just to join her sewing group page on Facebook : Mytreasuredheirlooms to get this pattern (hint: not only this pattern is free on her page).
It is called trio because you can make the circle skirt in 3 ways; full circle, half circle and quarter circle. All with pattern pieces to print and tape together. If you don't want to calculate, this pattern is just right for you!
This skirt made from full circle pattern with Ikea fabric. It's the favorite skirt of my girl at a moment.


  I also made a half circle skirt. It's not provide that much twirly factor but it's nice on it's own style. I recommend you follow the instructions by select true size according to given measurement. Do not go over size or you may need the suspenders as my girl needs


See? Circle skirt is fun and easy. Select your beautiful fabric and have fun with these free pattern/tutorial.

Find more about "February free for all" or show your creation on linky party, please visit Frances & Suzanne for more information. Let's joint the train of fun for free!

Thank you for visiting my site, your comments will make my day :)

Penya


Thursday, December 11, 2014

Re-fashion : Girly nightgown

I didn't blog for a long period with the typical reason, nursing baby. Well, as much as I hope I can manage to sew anything, I can not get things done except this quick project.

I've got this nightgown from flea market. Not intended to wear it myself but I bought it aiming to refashion to something and finally did it!


I made it to be a nightgown but the girl like it so much and wear it as a lounge wear around the day. She always want maxi dress and she think this is her cozy maxi.


The blue flower on her chest is made from felt. I made it to cover small print on tank top. I still have the top part of the dress. It will going to be matching outfit for the baby when I've got time to hack it.


Friday, November 7, 2014

Blog tour: Pimp that pattern "The flutterby romper"

I've just post about how lucky I was being a tester for the flutterby romper and the flutterby playsuit from LittleKiwisCloset and said there are mores to come.

Here they come... 


Welcome to the Pimp that pattern blog tour

You may wonder (me too at first) what's the Pimp??? Well, amazing Lydia, the designer behind LittleKiwisCloset encourages us to alter the pattern and create our own style. I think this pimp out of the box is not easy because the pattern itself give you a lot and lot and lot of options already.

This time I made the matchy romper for both of my girl. 


The big sissy got the retro style romper. 

The pattern gives you the ruffle neck option in size 0-4 yrs. But I made this in size 5 for my young lady.

I did alter the pattern a bit by lengthen neck elastic so it looks almost off shoulder and I use soft double lace to get the look I want.

The little sissy's romper is in the coordinate printed fabrics. Actually, the pattern fits is just right but this romper seems to be loose because I made her the bigger size. She is growing like a weed lately and I want the longer use of this cutie.


I tried to make it to be a high waist rompet but since I sew it in bigger size the waist elastic sits up on her natural waist instead. I may get the looks I want in the next 2 month, I guess. ;)

I did the bias hem at the flutter sleeves and love them that way. I plan to make the short sleeves top with flutter in the next romper I make. I can imagine many many of this romper come out with bits of difference here and there. 

What I love about this pattern is the tons of option provided. You've got 5 sleeves styles to go with 4 bottom styles to mix up and create your own looks. They also come in the wide size range from nb to 12 yrs. With one pattern, I can make the romper for both of my girls and make them in variety styles. What's not to love about these!

If you’re looking for an easy to sew romper with the fun options this is the one for you! Snag yours with a special tour discount of 30% off till 8th Nov at Craftsy

The flutterby playsuit which I sew here also on sale during the blog tour.
Don't miss! this Flutterby playsuit is also on sale.

And don't forget to link up your Flutterby playsuit and romper at the end of this post. You still have more than 24 hrs to do it. It may takes as less as 1 hour to finish one romper depends on your options combination. Lydia will use random.org to choose a winner from those who link up and they will get to choose 2 patterns of their choice from the LittleKiwisCloset!!!


Your comments bright up my day!

Penya

Friday, October 17, 2014

Flutterby Romper&Playsuit for my tiny girl

I'm lucky enough to be one of the tester for Lydia of LittleKiwisCloset's new patterns: the Flutterby Romper and the Flutterby playsuit.

First thing that I was impressed by these pattern is how they are easy to sew. As a breastfed mom of a 2 months baby who seems does not like to sleep, you can imagine that free time doesn't exist. Anyway, I can manage to finished both cutie outfits during her short naps. Thanks for the clear instruction along with lots of photo that make every steps fast and easy.


The flutterby romper has a huge size range from nb to 12. I made size 0-3 for my little girl and happy with its fit. With the many variation for neck, sleeves and pants, I select the short lenght with flutter neck option and made it with seer sucker which suits to our warm climate. 


The eyelet ruffle made this outfit even faster to finish. No need to hem it, just cut and sew. Really love to see that soft pink ruffle frame around her face. 


The flutterby playsuit comes with many options for neck and sleeves as well. Both pattern have snap crotch option for baby.


I did double layer for flutter sleeves and added a cutie cat applique in the front. I sure my girl will has lot more of these Flutterbys in her little wardrobe. Such a fun and easy project to wipe up during too short nap of my baby!


Thank you for stopping by, Your comments will make my day!

Wednesday, September 10, 2014

Almost 1 month after my baby arrived!

It has been SO long for 9 months of pregnancy. But after I gave a birth for my little yummy girl, day and night blended and run by quickly. I can't believe that she will turn to 1 month old in a couple of day.
 
She is a tiny girl, weight 2630g at birth, 13th Aug.


We carried her back home in the swaddle blanket I made.


Apparently, most of clothes I made for her are still too big, a lot of room to grow up in.

 
Except the swaddler and head band that can fit her just right.


Big sissy is loving our new family member. She was only occasionally mention about me lacks of time for her.


Having a baby again is a precious moment but I miss my sewing machine sometimes. Manythings I want to make for both of my girls.


Only if my little miss take a nap longer!